PULSAR User’s Manual
Table of Contents
Shutter
An electro-mechanical shutter is positioned at the output of the PULSAR laser so that the laser beam can be blocked under switch control. There are three components to the shutter control system, the main control box, user beamline switches and transport tube beam blocks. The shutter is not attached to the interlock control system of the laser room
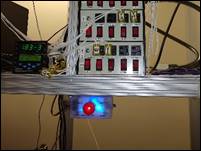
Shutter Control Box The main control box for the PULSAR shutter is on the shelf above the output of the laser. It has a single toggle switch in the lower left corner next to a line of LEDs. The toggle switch is used to open or close the shutter. To open the shutter, the switch should be moved to the up position. The LED next to the switch should light up.
If the switch is up and the LED is on but no beam is coming from the laser, look in the box at the output of the laser to see if the shutter is in the down position. If the shutter arm is horizontal, it is still closed. Push the switch on the control box to the down positon and then back to up. The shutter should open. If not, you will need to get help from lab staff. The most common cause of the shutter not opening is a power failure. The control box creates an energetic pulse to open the shutter, but supplies a much lower power level to hold it open. If power is turned on to the box while the control switch is in the up (open) position, the box will not have charged up the opening capacitor, and will only put out the holding voltage, which is not sufficient to open the shutter.
If the switch is in the up position but the LED is off and the shutter is closed, this means the shutter is being controlled by one of the user switches outside the laser room. This will be covered in the next section. To test that the shutter is working, move the switch to the down position and go to the box where the beam is launched into the north transport tube. Push the red button on the beam block in front of the tube window so that the beam block pops up in front of the window. Now when the shutter control switch is moved up, the LED should come on and the shutter open.
User Beamline Switches There are three switch boxes in the user areas for the PULSAR laser that are associated with the shutter operation. These switches allow users to control the shutter from their experimental stations. The switch boxes incorporate LED lights to indicate the status of the system.
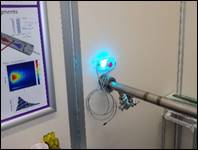
For the north transport tube, there are three separate user switches. One switch is at the ECR ion beam station. One switch is at the COLTRIMS/XUUS area. There is a third switch where the transport tube comes through the wall into the experimental area.
![]()
When the transport tube is not in use, the switch boxes will have no lights on. If both the blue light inside the switch box and the red light in the center of the button are on, the transport tube is ready for use and there could be laser light at the exit window. There is a third state with just the red light on in the center of the button. This state means that the transport tube is open for the beam, but the shutter is being kept closed by this switch.


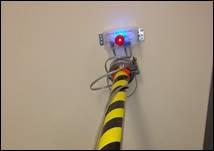
Transport Tube Beam Blocks There is a fixed beam blocks at the entrance of the transport tube. This block affect the status of the lights in the remote switch boxes.
Entrance beam block: The block at the entrance to the north transport tube is spring loaded with a push-on push-off action. When the block is in its highest position, it intercepts the PULSAR beam, preventing it from going into the transport tube. When the transport tube is blocked this way, all of the remote shutter switches are deactivated and will show no lights. The beam block should always be in this position when the laser is being serviced.
 To allow the
laser beam to pass into the transport tube, the beam block is lowered to its
bottom position so that the laser can pass over it. This is accomplished by
pushing down on the red button on the side of the block.
To allow the
laser beam to pass into the transport tube, the beam block is lowered to its
bottom position so that the laser can pass over it. This is accomplished by
pushing down on the red button on the side of the block.
When the beam block is down, in its open state, the lights in the remote shutter switches will come on while the master switch on the control box is up in the open state.
To get the tube-entrance beam block up into its blocking position, push down on the red button until it stops, then release the button. The block will spring up to its top positon.
WARNING: Never push in the center of the beam block, as your hand might be struck by the laser beam.
PULSAR ON Warning Light
There are lighted signs outside the main entrance to the PULSAR lab and at the air lock curtain at the back door. When these signs are light, the laser beam is in use in the user area. Protective goggles need to be used when entering the lab. Signs on the doors will indicate what hazards are present and what goggle filter to wear. The lights are manually controlled by a switch inside the PULSAR laser room. The switch is just inside the door of the laser room, above the interlock box. The signs are normally off when the transport tube is blocked so that laser radiation cannot go out into the user areas. Laser radiation may be present inside the laser room even when the door signs are off.
WARNING: Always wear protective goggles (GGL2) when going into the PULSAR laser room.
PULSAR Door Alarm
The doors to the PULSAR lab are alarmed to warn people they are entering into a hazard area. The alarms are always on, they are not tied to the Laser-On signs. An alarm will sound if the door is opened without having first bypassed the alarm switch. Pressing the button on the box next to the door will give you a 2-minute time interval to pass through the door without setting off the alarm. Once triggered, the alarm must be reset manually by pushing the button on the side of the alarm box on the inside of the door.
PULSAR Room Door Interlock
The sliding door into the PULSAR laser room is connected to the laser interlock system. Opening the door without bypassing the interlock will trigger the interlock. The effect of the door interlock will depend on the status of the laser. If all of the laser enclosures are closed, the interlock will only sound a warning alarm, but not effect laser operation. If either of the amplifier enclosures is open, the interlock will shut off the amplifier power supplies and close the shutter to the oscillator. If the oscillator enclosure is open, the interlock will shut off the oscillator pump in addition to shutting down the amplifiers. The interlock is reset with the box on the south wall of the laser room. The help of a PULSAR operator will be needed to restart the laser if any of the pumps has shut down.
Resetting Door Alarm: Close door! On interlock panel on south wall, push switch marked “Door” to “reset” position then release.